When deploying VMware Cloud Foundation (VCF) I can’t recommend enough that you deploy with BGP/AVNs. This will make your life easier in the future when deploying the vRealize Suite as well as making deployment and administration easier for Tanzu. What happens though if you can’t get your network team to support BGP? This is where VLAN-Backed networks come in.
First we should start the download of the bundles for the vRealize suite. Within SDDC Manager go to Lifecycle Management–>Bundle Management and download all of the vRealize bundles. Now that we have the bundles downloading lets move on to the vRealize Suite tab.

Usually the first indication that BGP/AVNs were not deployed comes from the vRealize deployment screen. Notice that the “Deploy” button is greyed out at the bottom with the message saying that the deployment isn’t available because there is no “X-Region Application Virtual Network”.

No problem, we are going to follow the VMware KB 80864 to create two edge nodes, and add our VLAN-Backed networks to SDDC Manager. When looking at the KB you will notice three attachments. The first thing we want to do is open the validated design PDF.

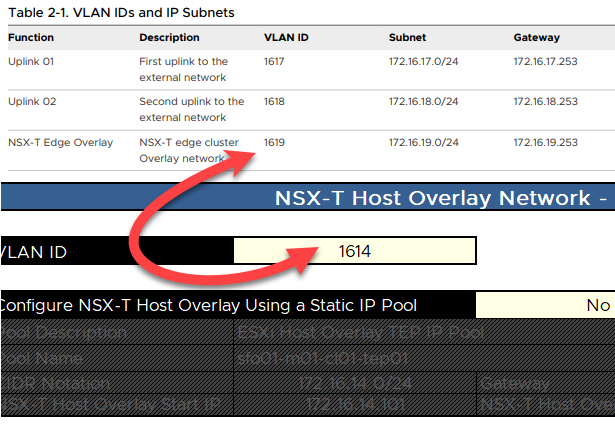
First we are going to need some networks created and configured. Part of the workflow will deploy a Tier-0 gateway where the external uplink are added. If you are not planning on using the Tier-0 gateway for other use cases (Tanzu), then the VLAN IDs and IP addresses you enter for the uplink networks do not need to exist in you environment. In my experience it is better to create all of these VLANs and subnets in case you want to use them later. The Uplinks don’t have to be a /24. You should be able to use something smaller like a /27 or /28. Every edge node will use two IPs for the overlay network. The edge overlay VLAN/subnet needs to be able to talk to the host overlay VLAN/subnet defined when you deployed VCF.

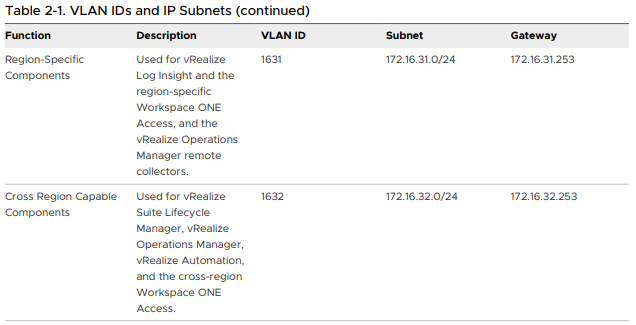
Next we have the networks that are going to be used by the vRealize Suite. Those two networks are Cross Region and Region Specific. The cross region is used for vRSLCM, vROPs, vRA, and Workspace ONE. The region specific network is used for Log Insight, region specific Workspace ONE and the remote collectors for vROPs.

Now that we have all of our network information, we need to copy the JSON example from pages 11/12 into a text editor like notepad++ or copy from the code below. This code is what we are going to use to deploy our edge VMs. Make sure DNS entries are created for both edge nodes and the edge cluster VIP. The management IPs should be on the same network as the SDDC Manager and vCenter deployed by VCF. Make the necessary changes using the networks discussed previously. In the next step we will get the cluster ID.
{
 "edgeClusterName":"sfo-m01-ec01",
 "edgeClusterType":"NSX-T",
 "edgeRootPassword":"edge_root_password",
 "edgeAdminPassword":"edge_admin_password",
 "edgeAuditPassword":"edge_audit_password",
 "edgeFormFactor":"MEDIUM",
 "tier0ServicesHighAvailability":"ACTIVE_ACTIVE",
 "mtu":9000,
 "tier0RoutingType":"STATIC",
 "tier0Name": "sfo-m01-ec01-t0-gw01",
 "tier1Name": "sfo-m01-ec01-t1-gw01",
 "edgeClusterProfileType": "CUSTOM",
 "edgeClusterProfileSpec":
   { "bfdAllowedHop": 255,
      "bfdDeclareDeadMultiple": 3,
      "bfdProbeInterval": 1000,
      "edgeClusterProfileName": "sfo-m01-ecp01",
      "standbyRelocationThreshold": 30
 },
 "edgeNodeSpecs":[
 {
 "edgeNodeName":"sfo-m01-en01.sfo.rainpole.io",
 "managementIP":"172.16.11.69/24",
 "managementGateway":"172.16.11.253",
 "edgeTepGateway":"172.16.19.253",
 "edgeTep1IP":"172.16.19.2/24",
 "edgeTep2IP":"172.16.19.3/24",
 "edgeTepVlan":"1619",
 "clusterId":"<!REPLACE WITH sfo-m01-cl01 CLUSTER ID !>",
 "interRackCluster": "false",
 "uplinkNetwork":[
      {
      "uplinkVlan":1617,
      "uplinkInterfaceIP":"172.16.17.2/24"
      },
      {
      "uplinkVlan":1618,
      "uplinkInterfaceIP":"172.16.18.2/24"
 }
 ]
 },
 {
 "edgeNodeName":"sfo-m01-en02.sfo.rainpole.io",
 "managementIP":"172.16.11.70/24",
 "managementGateway":"172.16.11.253",
 "edgeTepGateway":"172.16.19.253",
 "edgeTep1IP":"172.16.19.4/24",
 "edgeTep2IP":"172.16.19.5/24",
 "edgeTepVlan":"1619",
 "clusterId":"<!REPLACE WITH sfo-m01-cl01 CLUSTER ID !>",

 "interRackCluster": "false",
 "uplinkNetwork":[
 {
      "uplinkVlan":1617,
      "uplinkInterfaceIP":"172.16.17.3/24"
 },
 {
      "uplinkVlan":1618,
      "uplinkInterfaceIP":"172.16.18.3/24"
 }
 ]
 }
 ]
}
Within SDDC Manager on the navigation menu select “Developer Center” then click “API Explorer“. Expand “APIs for managing Clusters“. Click “Get /v1/clusters“, and click “Execute“. Copy the cluster ID into the script we were working on where is says to replace.

Now expand “APIs for managing NSX-T Edge Clusters“. Click “POST /v1/edge-clusters/validations. Copy the contents of your JSON file we created and paste into the “Value” text box then click “Execute“.

After executing, copy the “ID of the validation“.


Great! Now we are ready to deploy. Expand “APIs for managing NSX-T Edge Clusters” and click “POST /v1/edge-clusters“. In the Value text box paste the validated JSON file contents and click “Execute“. We now see the edge nodes deploying and can follow the workflow in the Tasks pane from within SDDC Manager.


Now that we have our transport zone we need to add it to both our hosts and edge nodes. Navigate to “System–>Fabric–>Nodes“. Drop down the “Managed by” menu and select your management vCenter. Click on “Host Transport Nodes” if not already selected and then click each individual server, then from the “Actions” drop down select “Manage Transport Zones“. In the “Transport Zone” drop down select the transport zone we created earlier and then click “Add“.

Next, make sure that the edge node creation completed successfully. Once we see that successful task, we need to go to “System–>Fabric–>Nodes“. From the “Managed by” menu drop down select your management vCenter. Click “Edge Transport Nodes“. Check the box for both edge nodes and then from the “Actions” menu select “Manage Transport Zones“. From the “Transport Zone” drop down select the new transport zone we created and click “Add“.


We only have one thing left to do within NSX Manager. We need to create the segments that will be used by SDDC Manager for the vRealize Suite. Navigate to “Networking–>Segments“. We are going to create two new segments. Click “Add Segment” and put the appropriate information in for the cross region network and then click “Save“. When prompted to continue configuring the segment click “No“.

Click “Add Segment” and put the appropriate information in for the region specific network and then click “Save“. When prompted to continue configuring the segment click “No“.

We are in the homestretch! The final piece to the puzzle is telling SDDC Manager about these new networks. Download the config.ini file and the avn-ingestion-v2 file to your computer. Make the appropriate changes to the config.ini (see example below).
[REGION_A_AVN_SECTION]
name=REPLACE_WITH_FRIENDLY_NAME_FOR_vRLI_NETWORK
subnet=REPLACE_WITH_SUBNET_FOR_vRLI_NETWORK
subnetMask=REPLACE_WITH_SUBNET_MASK_FOR_vRLI_NETWORK
gateway=REPLACE_WITH_GATEWAY_FOR_vRLI_NETWORK
mtu=REPLACE_WITH_MTU_FOR_vRLI_NETWORK
portGroupName=REPLACE_WITH_VCENTER_PORTGROUP_FOR_vRLI_NETWORK
domainName=REPLACE_WITH_DNS_DOMAIN_FOR_vRLI_NETWORK
vlanId=REPLACE_WITH_VLAN_ID_FOR_vRLI_NETWORK
[REGION_X_AVN_SECTION]
name=REPLACE_WITH_FRIENDLY_NAME_FOR_vRSLCM_vROPs_vRA_NETWORK
subnet=REPLACE_WITH_SUBNET_FOR_vRSLCM_vROPs_vRA_NETWORK
subnetMask=REPLACE_WITH_SUBNET_MASK_FOR_vRSLCM_vROPs_vRA_NETWORK
gateway=REPLACE_WITH_GATEWAY_FOR_vRSLCM_vROPs_vRA_NETWORK
mtu=REPLACE_WITH_MTU_FOR_vRSLCM_vROPs_vRA_NETWORK
portGroupName=REPLACE_WITH_VCENTER_PORTGROUP_FOR_vRSLCM_vROPs_vRA_NETWORK
domainName=REPLACE_WITH_DNS_DOMAIN_FOR_vRSLCM_vROPs_vRA_NETWORK
vlanId=REPLACE_WITH_VLAN_ID_FOR_vRSLCM_vROPs_vRA_NETWORK
[REGION_A_AVN_SECTION]
name=areg-seg-1631
subnet=192.168.100.128
subnetMask=255.255.255.192
gateway=192.168.100.129
mtu=9000
portGroupName=areg-seg-1631
domainName=corp.com
vlanId=1631
[REGION_X_AVN_SECTION]
name=xreg-seg-1632
subnet=192.168.100.192
subnetMask=255.255.255.192
gateway=192.168.100.193
mtu=9000
portGroupName=xreg-seg-1632
domainName=corp.com
vlanId=1632Using a transfer utility (I used WinSCP) transfer both the config.ini and the avn-ingestion-v2 file to the SDDC Manager. I placed mine in /tmp. Next SSH into your SDDC Manager. Login as “VCF” and the type SU and enter to elevate to root. Change directory to /tmp and then type the following to change ownership and permissions:
chmod 777 config.ini
chmod 777 avn-ingestion-v2.py
chown root:root config.ini
chown root:root avn-ingestion-v2.py
From our putty session we will ingest the config.ini file into SDDC Manager. Use the following to accomplish this:
python avn-ingestion-v2.py --config config.ini

#Other Options:
# --dryrun (will validate the config.ini but won't commit the changes).
# --erase (will clean up the AVN data in SDDC Manager)
We need to change the edge cluster that will be used. The file location changed in 4.2.1.
#4.1/4.2
vi /opt/vmware/vcf/domainmanager/config/application-prod.properties

#4.2.1
vi /etc/vmware/vcf/domainmanager/application-prod.properties
Add the following line replacing “sfo-m01-ec01” with your edge cluster name and then save.
override.edge.cluster.name=sfo-m01-ec01
The last thing to do is restart the domainmanager service.
systemctl restart domainmanagerSuccess!! We are ready to deploy the vRealize Suite!


